Southwest Stuffed Peppers

Well guys, here’s another Mexican recipe for you! Mexican food is definitely my “go-to” if you haven’t noticed! I love it all! I’ve made stuffed peppers before, but these were awesome and had so much flavor without being dried out 🙂

Ingredients:
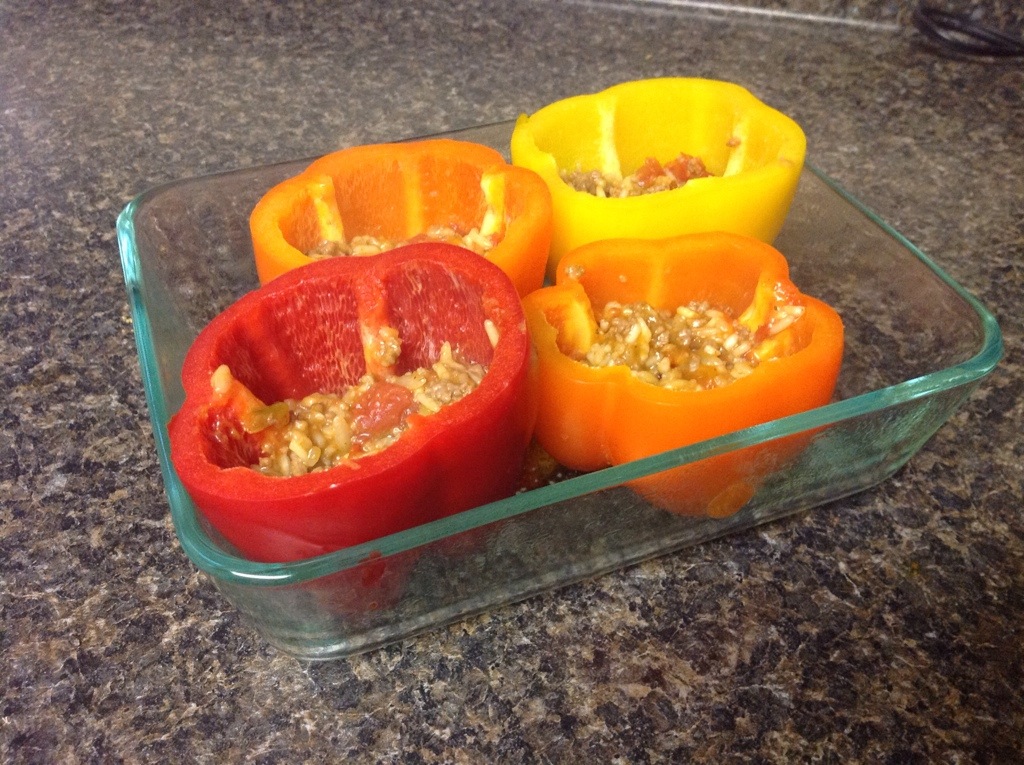
– 4 large peppers, I don’t care for green peppers too much so I used a combination of orange, red, and yellow bells
– 1 pound lean ground beef
– 1 can Rotel (diced tomatoes and green chiles) undrained
– 1 1/2 cups water
– 1 box (6.4 ounce) Mexican style rice and pasta mix (I used Rice-a-roni)
– 2 cups shredded cheddar cheese

Directions:
Preheat oven to 375F.
Slice tops off of your bell peppers and remove the seeds. Set aside.
In a large skillet with tall sides, cook beef until no longer pink; drain the excess fat and return to pan. Add the Rotel, water, and rice mix (seasonings and all). Give the mixture a big stir and bring to a boil. Reduce heat and cover, simmer for about 7 minutes or until most of the liquid is absorbed. Not all of it though, leave a little for moisture.
Place the peppers in a glass baking dish. Fill the peppers halfway with the rice/beef mixture. Add a layer of cheese and then fill them the rest of the way with rice.
Cover the dish with foil and bake for 25 minutes. After the time is up, pull out the peppers, top with some more cheese, and bake uncovered for another 10 minutes. The cheese should be nice and melted and the peppers should be tender.
Enjoy! 🙂

20140619-212721-77241593.jpg

20140619-212731-77251921.jpg

20140619-212820-77300528.jpg

20140619-212835-77315302.jpg

20140619-212907-77347587.jpg

20140619-212918-77358209.jpg

20140619-212938-77378836.jpg

20140619-212952-77392917.jpg

20140619-213008-77408779.jpg

20140619-213029-77429504.jpg

20140619-213039-77439657.jpg

20140619-213051-77451410.jpg

20140619-213116-77476727.jpg

20140619-213125-77485497.jpg

20140619-213138-77498927.jpg

20140619-213205-77525923.jpg

20140619-213213-77533551.jpg

20140619-213223-77543909.jpg

20140619-213232-77552534.jpg

White Bean and Sausage Soup

I love soups! Especially hearty soups with a big piece of cornbread or bread on the side, double yum! This soup really intrigued me because it was something a bit out of the norm for us, and it just looked so yummy too! The only things I would change is the salt content and doubling the recipe! After all three of us eating it for dinner there was only enough for my husband to take to work with him, and I was sad! Haha! The salt I really don’t think is necessary, since you already have the sausage which is naturally salty and the canned beans, even though they are rinsed well. So skip the salt, and you can always just add a little bit to your serving if you feel it needs a bit!

Ingredients:
– 2 tbsp. olive oil
– oval smoked sausage, cut into 1/4 to 1/2-inch thick rounds
– 1/2 onion, diced
– 4 cloves of garlic, minced
– 3 cans of white beans, drained and rinsed
– 2 1/2 cups chicken broth
– a few dashes of paprika
– pepper, to taste

* the original recipe called for fresh spinach, about 5 ounces. I personally don’t like spinach in my soups, but if you do, then just add it in right before you add the sausage.

Directions:
– Heat olive oil in a large skillet with tall sides. Add the sausage rounds and cook until slightly browned on both sides and cooked through. Remove sausage to a paper towel lined plate to sop up the excess grease.
Drain most of the grease from the sausage out of the pan, reserving just a little bit.
Add the diced onion and the minced garlic to the skillet and cook until the onions are softened and have a nice color on them, about 4- 5 minutes or so. Add the beans and the chicken broth, crushing a few beans with the back of your spoon to thicken the broth. Cook on medium-low heat for about 8 minutes or until the broth has thickened a bit. Add a few dashes of paprika and pepper, and if you’re adding the spinach, add it at this time too.
Fold the sausage into the soup, and serve immediately or it also makes fabulous leftovers.
Serve with cornbread muffins topped with a large pat of butter and some honey!

20140618-223333-81213525.jpg

20140618-223348-81228223.jpg

20140618-223406-81246077.jpg

20140618-223526-81326604.jpg

20140618-223543-81343309.jpg

20140618-223700-81420720.jpg

20140618-223718-81438951.jpg

20140618-223741-81461472.jpg

20140618-223806-81486904.jpg

Isn’t this onion storage container adorable?! 🙂

Triple Chocolate Cheesecake

For Father’s Day I wanted to make something special for my husband. He’s such a wonderful husband and father and he works so hard to allow me to stay home and raise our daughter. He definitely deserved some kind of tasty treat to go along with his Father’s Day present! Which by the way, he got a pressure washer, and it’s awesome!
Hubby loves chocolate like me, but to be honest I was burnt out with making chocolate cake after all the cakes for the birthday party. I wanted something a little different and something that I could whip up during nap time to surprise him with. I came upon a chocolate cheesecake recipe that seemed like a perfect fit! I haven’t made a lot of variations of cheesecake before, but I figured, how can you really go wrong with chocolate and cheesecake, and I would be correct! 😉

Ingredients:

Crust layer:
– 18 chocolate sandwich cookies aka Oreos, finely crushed
– 2 tbsp. granulated sugar
– 1/4 cup butter, melted

Filling:
– 1/4 cup semi-sweet chocolate chips
– 1/4 cup heavy whipping cream
– Three 8-oz. packages cream cheese, softened
– 1 cup granulated sugar
– 1/3 cup unsweetened cocoa powder
– 3 eggs
– 1 tsp. vanilla extract

Topping:
– 1 1/2 cups semi-sweet chocolate chips
– 1/4 cup heavy whipping cream
– 1 tsp. vanilla extract

Directions:

Preheat your oven to 350F. Lightly spray a spring form pan or a 9-inch pie plate with cooking spray.

Begin by making your crust. Combine the crushed Oreos, sugar, and melted butter in the bottom of your pie plate. Press the mixture into the bottom of the pan to form the crust. Bake in the preheated oven for 8-10 minutes, and remove from the oven to cool. Bump your temperature down to 325F.

Now, we’ll move onto the filling. In a small saucepan, combine the chocolate chips and whipping cream. Cook on low and continue stirring until completely incorporated. Set aside to cool.
In the stand of your mixer, combine the cream cheese and the granulated sugar. Beat until smooth, add the cocoa, mix well, and then add the eggs, beating well again.
Once the chocolate cream mixture is cooled, add it and the vanilla to the mixer. Beat until completely incorporated, then pour the batter into your cooled crust. Bake in your preheated oven for 45-50 minutes, or untill the cheesecake passes the toothpick test in the center. The edges will also start to crack a little bit to signal it’s doneness.
Remove from the oven and allow to cool completely before making your topping.

Lastly we’ll make the topping. In a small saucepan, combine the last of the chocolate chips, whipping cream, and vanilla. Cook on low heat until incorporated. Stir continuously until it is smooth, and make sure to not burn your chocolate. Pour on top of the cooled cheesecake and spread it out evenly. Refrigerate for at least 3 hours, or overnight if possible. I topped mien with a heaping spoonful of whipped cream and some fresh berries to put it over the top!
Enjoy!

20140618-095128-35488962.jpg

20140618-095147-35507454.jpg

20140618-095204-35524183.jpg

20140618-095226-35546092.jpg

20140618-095354-35634465.jpg

20140618-095426-35666580.jpg

20140618-095427-35667263.jpg

20140618-095553-35753560.jpg

20140618-095554-35754269.jpg

20140618-095555-35755049.jpg

20140618-095808-35888152.jpg

20140618-095809-35889531.jpg

20140618-095810-35890293.jpg

20140618-095808-35888849.jpg

20140618-100153-36113434.jpg

20140618-100152-36112771.jpg

20140618-100152-36112091.jpg

Biscuits and Gravy

Biscuits and Gravy is one of Hubby’s favorite meals to order out when we go out to breakfast. Now that we have a 2 year old we don’t get out of the house very early these days and he rarely gets it. I’m not a big white gravy fan, but I told Josh I would make biscuits and gravy for him so I made good on my promise and put it on the menu. The recipe I used was from my idol, The Pioneer Woman, and I really liked it because there were minimal ingredients and it was a simple recipe for my first attempt. I will say that biscuits and gravy still isn’t my absolute favorite meal, but Hubby said it was delicious and he’s already requested it again! I suppose that means that it was a hit! 😉

Ingredients:
– 1 pound breakfast sausage, I just bought the cylindrical Jimmy Dean sausage
– 1/3 cup flour
– 4 cups whole milk
-1/2 tsp. seasoning salt
– 2 tsp. black pepper, to taste
– biscuits, I just used canned biscuits

Directions:
Crumble and brown the sausage over medium-high heat, until fully cooked. Turn the heat down to medium-low and sprinkle in half of your 1/3 cup of flour. The sausage will absorb most of the flour initially, then add the rest of the flour to the pan. The sausage will look pretty dry at this point. Continue stirring as you increase the heat to medium-high.
Slowly pour in the milk, and add in the pepper and seasoning salt. Once the mixture comes to a boil it will thicken very quickly, so just keep stirring about 8 minutes or so until it is very thick. If the gravy becomes too thick, you can thin it out with a little bit more milk.
Taste and adjust your seasoning before serving over warm biscuits. I served this meal with a side of hash browns and fresh fruit.

20140605-231658-83818675.jpg

20140605-231709-83829867.jpg

20140605-231722-83842956.jpg

20140605-231735-83855700.jpg

20140605-231746-83866540.jpg

20140605-231803-83883173.jpg

20140605-231830-83910491.jpg

20140605-231840-83920573.jpg

20140605-231849-83929695.jpg